| Version 9 (modified by , 14 years ago) (diff) |
|---|
Quickstart
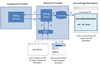
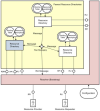
From a service provider point of view the Sensei Framework provides a few central services that can be distributed around the network: Resource Directory (RD), Semantic Query Analyser (SQR), Entity Directory (ED), AAA Service (AAA), Privacy and Billling Service and the Execution Manager.
There are two ways to access these resources: there is a public access to the VM server farm in Bucharest with services linked to Erricson, Telenor and Oulu University, or there is an all-in-one Virtual Machine used for development.
The usual requirements for hosting these services are:
- a linux machine (we use RHEL-flavored operating systems, but any system should do)
- Sun Java JDK 6.0
- Apache Tomcat v.6.0.20
- Mysql 5
- IPv6
- SSL Certificates for AAA and Privacy & Billing
IPv6 is needed for communicating with the nodes. For this, you can use a native IPv6 network or IPv6-over-IPv4 tunnels. The current Sensei network uses !GoGo6 (http://www.gogo6.com/) for Ipv6 tunneling.
Installing software requirements
We will not cover installing the operating system. If you are using a virtual machine, please do not forget to install Integration Components Support or use paravirtualized drivers if you're using Xen. This is named different in each virtualization technology: in VMWare - VMWareTools, Hyper-V - Integration Components v.2.1. Due to the fact, that many services use security protocols, we need a good time syncronization. It is advised that all systems should use NTP.
The sensei stack has been used in diferent operating systems and setups: sensei-dev1.grid.pub.ro is a Xen Virtual Machine, sensei-demo.grid.pub.ro is a ESXi hosted Virtual Machine, the Sensei All-In-One Virtual Machine is a VMWare Player Virtual Machine and so on.
Sun Java 6.0 JDK and Apache Ant
You can download the sdk from http://java.sun.com (direct link: http://www.oracle.com/technetwork/java/javase/downloads/index.html). Due to the fact that we'll be using java from the command line you should also set the necesarry environment variables JAVA_HOME and JDK_HOME. It is advisable to use the bin version of the archive and install it in /opt/java for example.
Download java to /opt/java, make the file executable (chmod +x filename) and run it. In our example, java will be installed in /opt/java/jdk1.6.0_20. Other locations possible to find the java instalation would be /usr/java, /usr/lib/jvm (depending of the OS flavor).
Put Java in the Environment Path by adding the following file to /etc/profile.d: (filename ex: java.sh)
export JAVA_HOME=/opt/java/jdk1.6.0_20
export JDK_HOME=/opt/java/jdk1.6.0_20
export ANT_HOME=/opt/apache-ant-1.8.1
export PATH=/opt/java/jdk1.6.0_20/bin:/opt/apache-ant-1.8.1/bin:$PATH
Several components might use compiling. If you do not have access to a GUI, then you can use Apache Ant (http://ant.apache.org/). Just download it and install it in /opt/apache-ant-1.8.1.
Apache Tomcat & Mysql
You can use any application server you like. The one we used was Apache Tomcat 6.0.20. Just download it and unpack it in /opt/apache-tomcat-6.0.20. For ease of development, we recommend using the tar.bz2 version for apache tomcat and the operating system provided mysql.
To install mysql on a RHEL-flavored machine and configure it to run at startup:
   yum -y install mysql mysql-server
   chkconfig mysqld on
IPv6 Connectivity
You may get IPv6 addresses from your ISP or you can tunnel IPv6 over an IPv4 network.
If you want to use the setup for local development (nodes included) and do not need internet access through Ipv6, you can use radvd, a linux IPv6 Router Daemon advertiser. For the address space, just go to http://www.simpledns.com/private-ipv6.aspx and get your own random private ipv6 address space. Theese networks will not get routed in the internet and you can use them locally.
For Gogo6 you must go to http://www.gogo6.com/ and create yourself an account. (there is a the posbility of anonymous use also). You must download the FreeNet? 6 client and run it. The client is named gw6c and we install it in /opt/gw6c. The is a sample configuration file you must edit, gw6c.conf. The most important settings are:
#
userid=
passwd=
#server=anonymous.freenet6.net
server=authenticated.freenet6.net
#   host_type=<host|router>
#
host_type=router
To run it, run gw6c and it will daemonize by itself. To test your ipv6 setup just
ping6 ipv6.google.com
If you need a static address, just configure it from /etc/sysconfig/network
NETWORKING=yes
NETWORKING_IPV6=yes
HOSTNAME=sensei-dev1.grid.pub.ro
and /etc/sysconfig/network-scripts/ifcfg-eth0
# Broadcom Corporation NetXtreme BCM5721 Gigabit Ethernet PCI Express
DEVICE=eth0
BOOTPROTO=none
HWADDR=00:14:5E:30:9A:40
IPADDR=141.85.224.33
NETMASK=255.255.255.0
NETWORK=141.85.224.0
ONBOOT=yes
GATEWAY=141.85.224.1
TYPE=Ethernet
IPV6INIT=yes
#IPV6ADDR=2607:f0d0:1002:0011:0000:0000:0000:0001
#IPV6_DEFAULTGW=2607:f0d0:1002:0011:0000:0000:0000:0001
SSL Certificates
This is the most important step for security services. Not only you got to have an ssl certificate, it must be trusted by all partners. You can get free SSL certificates at StartSSL for free, but for development you might consider to generate on youself. We will not cover this section here, you can use for example the CA.pl perl script in the openssl-perl package to create yourself a Cerificate Authority that will sign you cert, or you can use openssl directly.
The important step is to tell tomcat an java about the certificates.
To configure Tomcat you must follow these steps: http://tomcat.apache.org/tomcat-6.0-doc/ssl-howto.html The tricky bit is getting Java JRE to trust this certificate. The easyest way is to use this Java program.
[to add link and howto]
Compiling Sensei Services in the CLI
In case you need to compile the services you can use ant. Each project has a *.properties file for customizations.
To build a service:
ant build
To run a service. Just check the build target and run it:
[root@sensei-dev1 SQRv2]# ant -p
Buildfile: build.xml

        Sensei SQRv2

Main targets:

 TestSQRLookup   Run ARD Server
 all             Clean build and dist, then compile
 build           Build everything
 clean           Delete old build and dist directories
 dist            Dependency jar
 runSQRv2Server  Run ARD Server
Default target: build
[root@sensei-dev1 SQRv2]# ant runSQRv2Server
In case you need as a daemon (close the terminal session and still have the service running, just use nohup.
[root@sensei-dev1 SQRv2]# nohup ant runSQRv2Server &
This will create a nohup.out file with all the output.
Running Sensei Services in the CLI
For running a service, you can use ant and nohup (in case you have source code access), or java directly
nohup java -jar RestEoiv3.jar &
To check the service is running, look at the output file and/or check that the serivice is running on the specified port.
[root@sensei-dev1 RESTEoiRepov3]# netstat -anp | grep java | grep LISTEN
tcp        0      0 :::9000                     :::*                        LISTEN      2669/java
tcp        0      0 :::42896                    :::*                        LISTEN      2669/java
We have two services running on ports 9000 and 42896.
Attachments (8)
- hosted_service.png (49.0 KB) - added by 14 years ago.
- virtual_machine_deployment.png (19.7 KB) - added by 14 years ago.
- aaa.png (10.4 KB) - added by 14 years ago.
- ed.png (2.6 KB) - added by 14 years ago.
- privacy_and_billing.png (59.4 KB) - added by 14 years ago.
- rd.png (8.1 KB) - added by 14 years ago.
- sqr.png (2.9 KB) - added by 14 years ago.
- hosted_service_small.png (22.2 KB) - added by 14 years ago.
Download all attachments as: .zip