Resource Directory Cookbook
This document includes instructions about installing and running the SENSEI Resource Directory.
Table of Contents
- Introduction
- Requirements
- Download the code
- Compilation
- Setting up MySQL database
- Running the ARD Repository
- Running the Resource Directory
Introduction
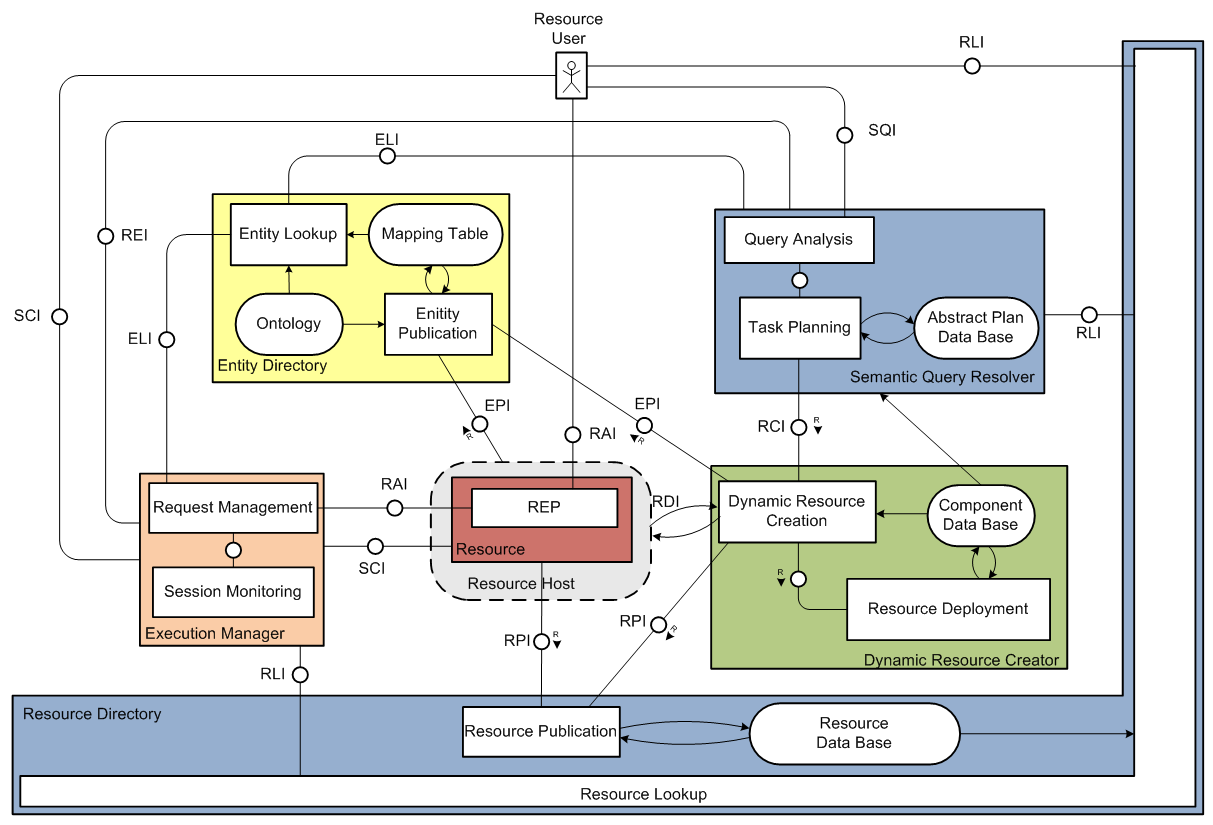
The role of the Resource Directory (RD) is to make the glue between Resources who advertise the operations they offer as Resource Descriptions and potential clients that look for particular functionalities. Its place in the overall SENSEI system is presented below.
 in the SENSEI system")
The main components comprising an RD are the following:
- Resource publication - responsible for publication of available resources and their descriptions
- Resource lookup - based on the received search parameters identifies suitable resources in the Resource Database
- Resource database - stores descriptions of all resources
RD supports the following interfaces for interaction with other SENSEI modules, Resource Providers and Resource Users:
- RPI - Resource Publication Interface
- RLI - Resource Lookup Interface
The RD functionality is implemented in JAVA programming language in combination with a MySQL database for persistent storage of data. The RD objects are passed through JAVA DAO (Data Access Object) to database stored procedures for data management. Interaction with the resources and users is based on the Restlet framework (http://restlet.org). The Restlet approach utilizes the basic HTTP methods (POST, GET, PUT, DELETE) to build CRUD (Create, Read, Update, Delete) applications. All requests to RD and RD responses are XML formatted messages. Resources publish their descriptions using the RPI, while users search for specific resources using the RLI. Resource Descriptions are XML structures containing a set of tags describing the Resource, as well as the URL where the so called Resource Endpoint (REP) – access point to the Resource is located. REP provides the Resource Access Interface (RAI) for accessing the Resource.
Advanced Resource Description (ARD) is type of tags that can be attached to the Resource Description. ARD is used to semantically describe SENSEI resources, it is specified in RDF (Resource Description Framework) format and can be queried with SPARQL statements using RLI.
RD Notification Manager is in charge of maintaining subscriptions for clients subscribing to a Resource lookup, e.g. requesting information whenever a Resource Description is updated according to the defined criteria, a new resource matching the criteria becomes available or is not available anymore (criteria is based on the set of basic tags). An entity can subscribe to the RD by sending an XML message to RLI using HTTP POST method. RD Notification Manager will periodically send notifications to the specified callback URL, which should be enabled to receive an incoming connection.
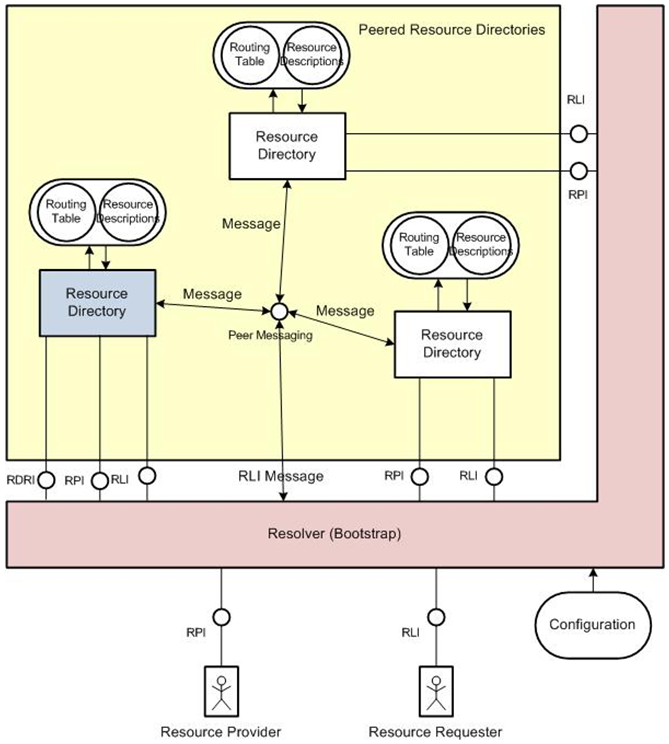
Peering is a voluntary interconnection of Resource Directories for the purpose of exchanging traffic between the Resource Directories. It can for example be used by distributed Resource Directories to create a (virtual) federated Resource Directory. The Resource Directory peering mechanism allows a set of distributed Resource Directories to store Resource Descriptions based on responsibility sharing based on domains (i.e. an RD will hold only Resource Descriptions for resources that belong to one of the domains the RD serves). The unique resource identifier that is part of the Resource Description for a resource contains the domain the resource belongs to. The naming and addressing mechanism for SENSEI is described in more detail in [SENSEI D3.4].
In principle the peering mechanism makes the RDs aware of each other. The awareness is provided by a messaging protocol that all the participating RDs adhere to. The messaging between the RDs is used to propagate Join, Leave and Alive messages between the Peered RDs.

If you try to lookup a resource that belongs to a different domain than the domain(s) served by the RD you are doing the lookup to, the request will be forwarded to the RD that, based on the domain, should hold the resource (if any). When you try to publish a new resource, the RD you try to publish to will also use this forwarding strategy if the resource you are trying to publish belongs to a different domain than the ones served by the RD you do the POST to.
If you try to lookup or publish a Resource Description that belongs to a domain that is not served by any RDs in the set of peered RDs, you will get the following return message:
<Error>No RPI server for domain: TheGivenDomain.com</Error>
Requirements
- Windows or Linux operating system
- Java SDK, version 6.0 or higher
- Eclipse IDE for Java EE Developers
- MySQL server, version 5.0.3 or higher
- Sedna XML database
- Resource Directory v2 (RD Eclipse project)
- RESTArdRepov2 (ARD Repository Eclipse project)
Download the code
Download Eclipse projects in tar.gz format and unpack them:
Resource Directory download link
Compilation
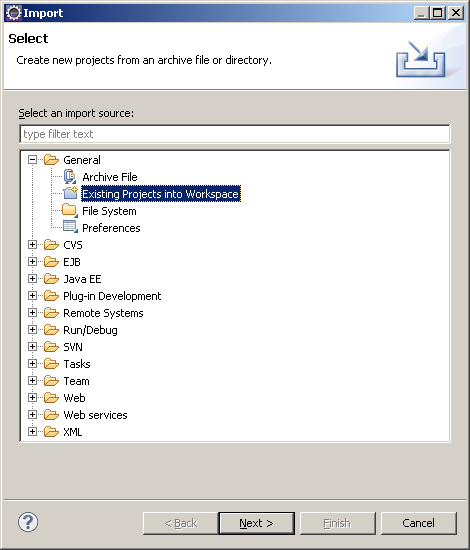
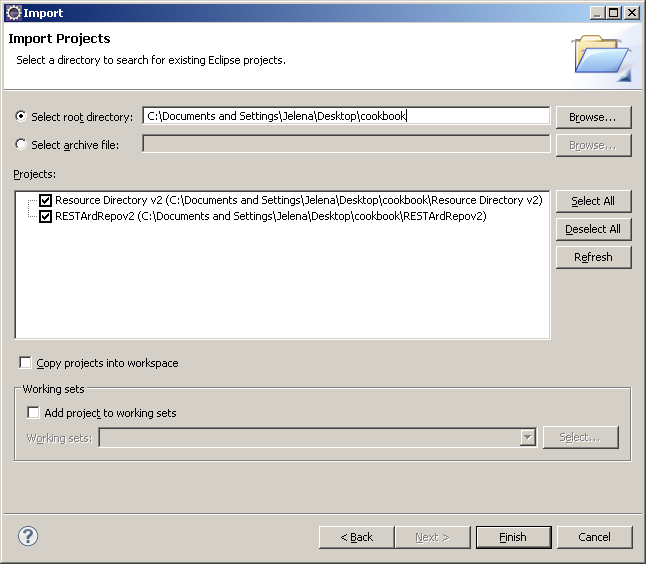
Import [Resource Directory v2] and [RESTArdRepov2] projects into Eclipse workspace by selecting File -> Import -> General -> Existing Projects into Workspace from the Eclipse main menu:


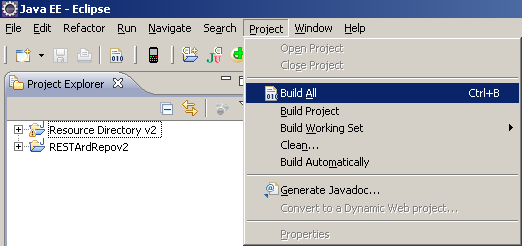
Java source files from both projects should be automatically compiled if Project -> Build Automatically option is checked in Eclipse:

If Build Automatically option wasn't checked, you should compile projects by selecting Project -> Build All:

Compiled Java classes can now be found in the bin directory inside each project.
Database connection properties for the RD application can be modified if needed, inside the file ConnectionPool.properties from database package in the [Resource Directory v2] project. Properties should be edited if you've changed the database name or user's name in SQL scripts, or if your MySQL server doesn't run on localhost or on the default MySQL port 3306.
Setting up MySQL database
SQL scripts can be found in the Resource Directory v2/doc directory.
First, SQL script ResourceDirectory_v2_create_user.sql should be executed in order to create a DB user. Do it only once, otherwise you'll get the following error (if the user already exists):
ERROR 1396 (HY000) at line 5: Operation CREATE USER failed for 'sensei_rd2'@'%'
Then run the script ResourceDirectory_v2.sql to create the RD database structure.
SQL scripts can be executed using e.g. MySQL Command Line Client or MySQL Query Browser.
Or, scripts can be run from command prompt using the following commands:
# create DB user
mysql -u root -p < ResourceDirectory_v2_create_user.sql
Enter password: ************ (root password)

# create database structure
mysql -u root -p < ResourceDirectory_v2.sql
Enter password: ************ (root password)
Instructions for setting the MySQL max_connections variable can be found in MySQL_config.txt file.
Running the ARD Repository
First, Sedna XML database for the ARDs (Advanced Resource Descriptions) should be set up.
Download Sedna for your operating system from http://modis.ispras.ru/sedna/download.html
- Unzip the downloaded file
- Run Sedna:
SEDNA_PATH/bin/se_gov.exe - Create arddb database (do it only once):
SEDNA_PATH/bin/se_cdb.exe arddb - Start arddb database:
SEDNA_PATH/bin/se_sm.exe arddb
Steps for stopping Sedna:
- Stop arddb database:
SEDNA_PATH/bin/se_smsd.exe arddb - Stop Sedna:
se_stop.exe
Java class ArdRepoServerMain from the com.sap.research.sensei.arddirectory.rest.test package from [RESTArdRepov2] project should be run in order to start the ARD Repository. That can be done by executing the batch file inside the [RESTArdRepov2] directory: runArdRepov2.bat will run on Windows OS, or runArdRepov2_linux.sh on Linux.
After that, ARD listing should be available at http://localhost:8185/ardrepo/ard
Running the Resource Directory
There is a batch file inside the [Resource Directory v2] folder that can be used to start the RD: runRDv2.bat will run on Windows OS, or runRDv2_linux.sh on Linux.
The batch file can be called with -help option, for getting a list of available RD startup parameters:
c:\path\Resource Directory v2>runRDv2 -help

usage: Resource Directory
 -help			Print this message
 -host <host>		The routable IP address of this server (e.g: 173.1.81.228)
 -peered <peered>	The domains this peered server serves
 -port <port>		The server port number
 -version		Print the version information and exit
The RD can be run in non-peered mode by executing the batch file without parameters:
runRDv2
The RD can be run in peered mode by executing the batch file with -peered and -host options:
# RD serving ericsson.com domain
runRDv2 -peered ericsson.com -host 173.1.81.228

# RD serving multiple domains
runRDv2 -peered ericsson.com telenor.com telenor.no -host 173.1.81.228
The RD can be run with port option, for example:
runRDv2 -port 8888
for running the RD on port 8888. If -port option is not used, the RD will run on its default 8184 port.
After starting the RD, you should be able to access it from a web browser at http://localhost:8184/rd.
The RPI (Resource Publication Interface) and RLI (Resource Lookup Interface) will be located at:
http://localhost:8184/rpi
http://localhost:8184/rli
http://localhost:8184/rli/mix/lookup
If the RD is started in peered mode, the list of domains that this RD serves and the list of all other RDs in the peering network will be available at:
http://localhost:8184/rdridomains
Attachments (7)
-
1.png (10.0 KB) - added by 14 years ago.
Eclipse main menu
-
2.png (18.3 KB) - added by 14 years ago.
Eclipse Import dialog
-
3.png (20.9 KB) - added by 14 years ago.
Import existing projects into Eclipse
- 4.png (14.6 KB) - added by 14 years ago.
- 5.png (14.5 KB) - added by 14 years ago.
-
rd-peering.png (204.8 KB) - added by 14 years ago.
RD peering
-
sensei-system.png (100.4 KB) - added by 13 years ago.
The role of the Resource Directory (RD) in the SENSEI system
Download all attachments as: .zip