Privacy and Billing Cookbook
This document includes instructions how to install and to run the SENSEI's privacy preserving access control and billing solution.
Table of Contents
- Introduction
- Deployment Scenario
- Installation
- Setting up the Secret Key
- Running the Test Application
Introduction
The SENSEI privacy preserving billing solution brings Access control and Accounting support into the SENSEI framework architecture. Access control ensures that resource access is granted only to entities that are entitled to do so. The Accounting service is used for tracking the usage of resources for billing purposes.
Conventional security architectures are based around the use of security tokens and policies. Security tokens are means of proving an identity of the entity using cryptographic methods in the digital world. Usually a security token consists of machine-readable cryptographic keys (or passwords) and the identity of its owner. Policies are a set of rules that the system has to follow in making administrative decisions. Checking the validity of a user's security token before granting/denying the network access could be an example of such a rule.
Including the identity of users in security tokens may introduce privacy problems. Users/entities leave their digital identities along with data about their movements and actions within the SENSEI framework architecture. This allows e.g., the resource providers to profile the behavior of their customers. With the growing number of services and information offered in the digital world, the number of situations where there is a need for protecting the privacy of users is increasing. The SENSEI privacy preserving billing solution deals with this problem and provides a solution that is based on purely symmetric cryptography.
Deployment Scenario
The implementation of the privacy preserving access and billing protocol involves the following components:
- User: This component represents the browser of the user used for sending a service query to the REP.
- REP: This is the resource end point, e.g., a gateway responsible for replying the user queries.
- Billing Client: This is component is responsible for i) storing the digital coins received from the Billing Service for the provided services. ii) authenticating the user requests by communicating with the Billing Service component of the framework provider.
- Billing Service: This component is responsible for checking the authenticity of the user requests and sending an access control decision to the billing client. In case of an authentic access request, the billing service sends a digital coin among its decision "grant access" to the Billing client. Otherwise a "deny access" message is sent to the Billing Client.
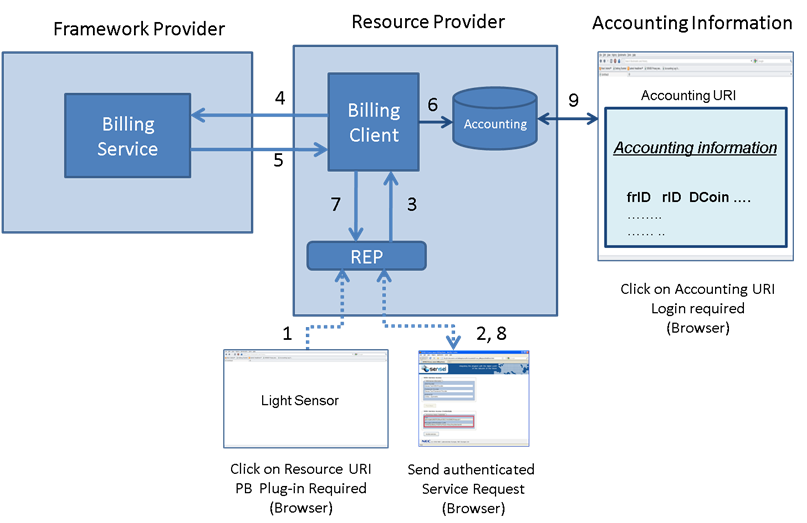
 A deployment scenario where a SENSEI resource user wants to access a resource that requires payment which is protected by the privacy preserving access and billing protocol is illustrated in the figure above. The protocol is executed as follows:
- Resource user gets the URI of the resource e.g., from the Resource Directory and then inputs it into the browser.
- REP returns a form page including parameters required for computing the authentication token. User invokes a request that is authenticated by the browser's privacy&billing plug-in.
- REP passes the request to Billing Client.
- Billing Client passes the request to the Billing Service for authentication.
- Billing Service grants access if the request is authentic and sends a digital coin to Billing client with its decision.
- Billing Client stores the digital coin and logging information in an Accounting database
- Billing Client sends the access control decision to REP.
- REP provides the requested service or denies it depending on the authorization decision.
The accounting information stored in the Billing Client component can be accessed via a browser as shown in the step 9. The components of the privacy and billing solution is designed in a modular way. This enables them to authenticate resource requests forwarded from any REP.
Installation
Software Requirements
To install and run the SENSEI privacy preserving access and billing protocol, the following software packages must be installed:
- Linux PC
- Java SDK, version >= 6.0
- Eclipse IDE for Java EE Developers
- Firefox, version >= 3.6.x
- Privacy&Billing software package
- Privacy&Billing plug-in for Firefox
Configuring Eclipse
In order to run the demo in eclipse, you need first import the project into eclipse's work space. In order to do so, download the Privacy&Billing software package including all files and extract it into a directory as follows. In the following, it is assumed that the software package is saved in ~/tmp.
$ cd ~/tmp
$ tar -xvf privacy_billing.tar.gz
This extracts five eclipse projects LIB, NEC-BILLING-COMPONENTS, NEC-Billing-Client, NEC-REP, and Servers in the ~/tmp directory. Now, you need to import these projects in the workspace of eclipse.
To do so, first install Eclipse IDE for Java EE Developers and import the projects files in your workspace.
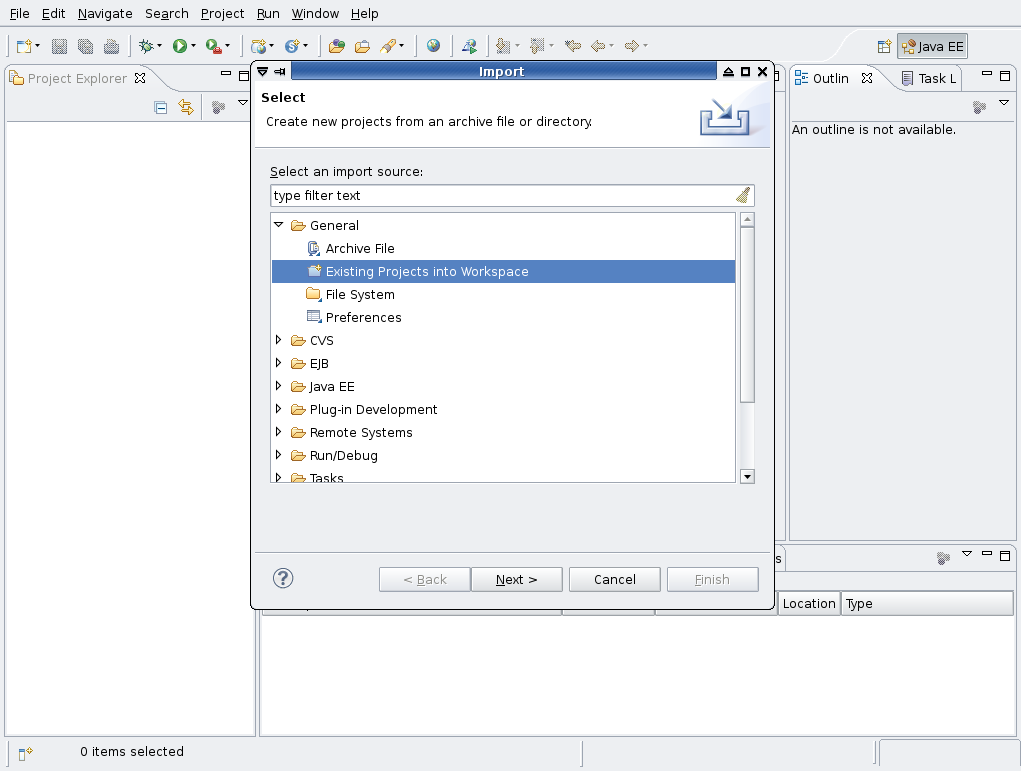
First select the File-->Import option in the main eclipse window as shown below

Choose General->Existing Projects into Workspace from the import menu as below

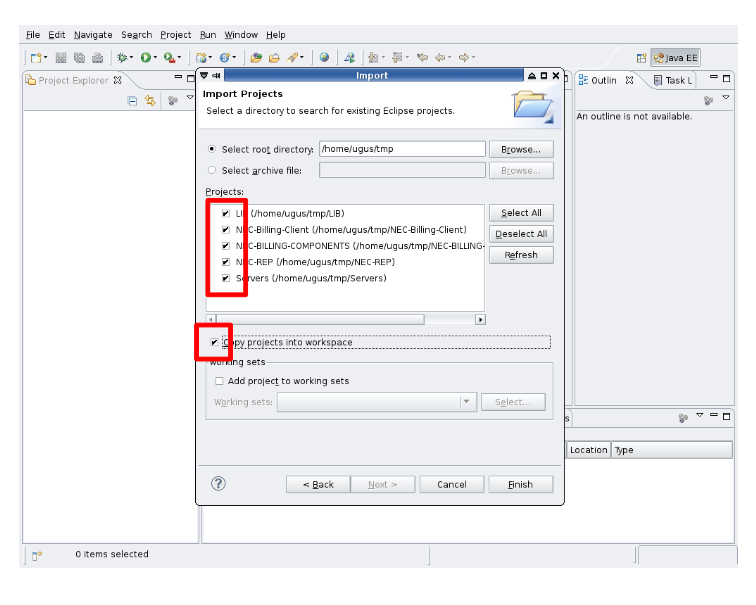
Navigate to ~/tmp directory and mark all projects for import and select the Copy projects into workspace option

And finally click on the finish button to build the workspace. Ignore any warnings you see in the markers window of Eclipse.
Apache tomcat will be used for deploying the web applications. A copy of tomcat server is stored under the project Servers. So you do not need to download it. But, eclipse should be configured to use it.
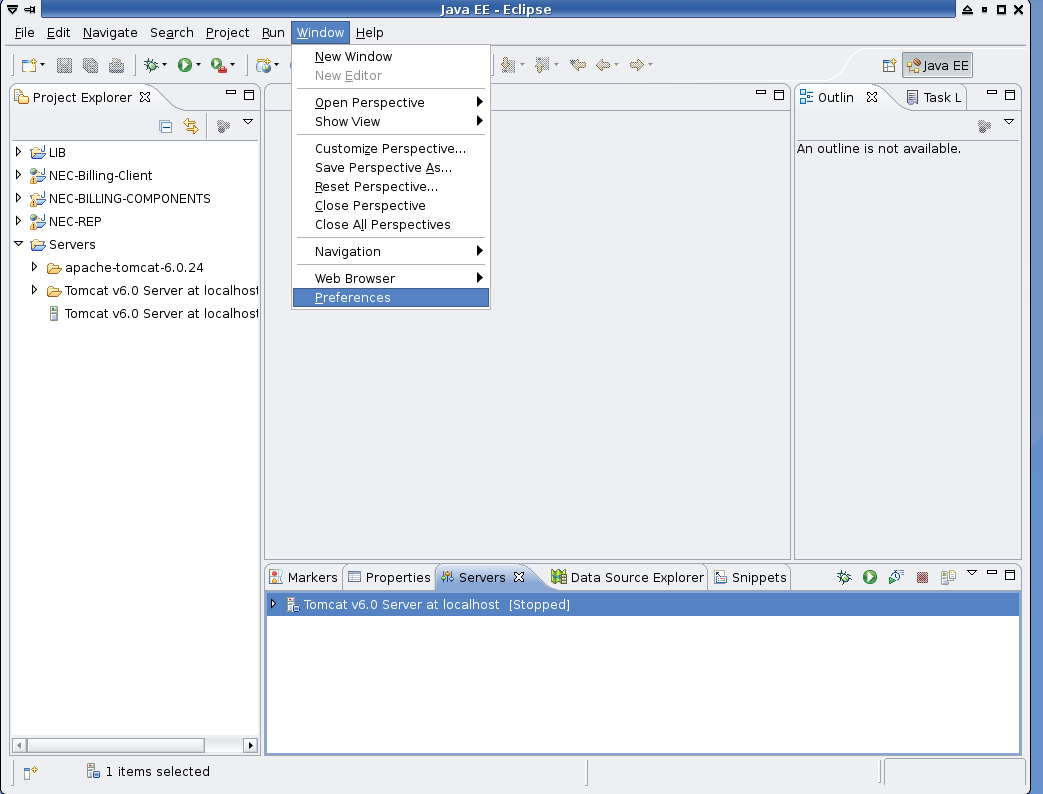
To add the tomcat server, select Window-->Preferences as shown below

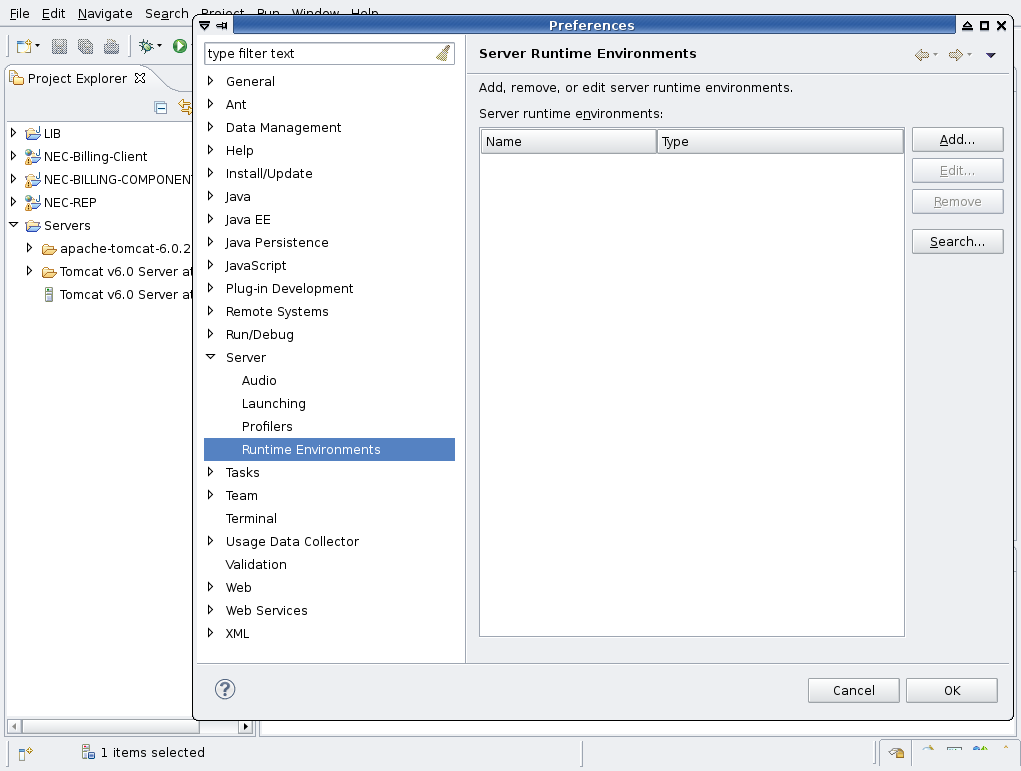
choose Server-->Runtime Environments in the preferences window to edit the run-time servers.

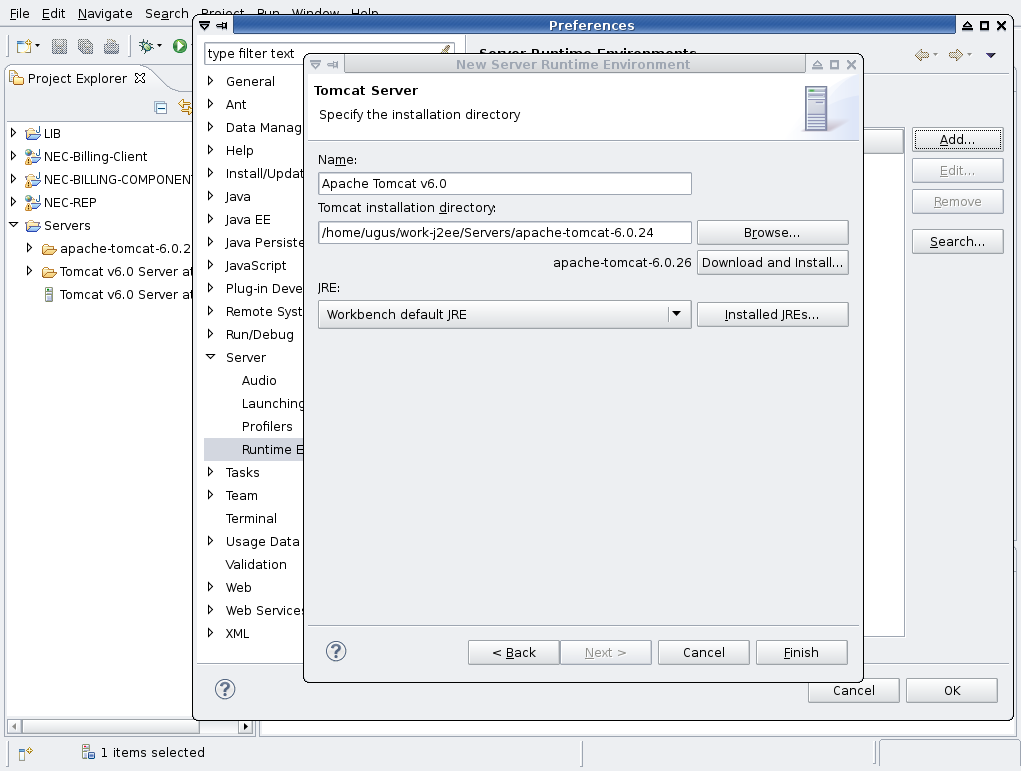
Click on Add button and select Apache Tomcat v6.0 as shown below

Click on Next button and browse to the apache-tomcat-6.0.24 directory which is located under the Servers project and click on finish. This is shown in the figure below.

Please note that the Servers project is stored in the workspace directory of Eclipse.
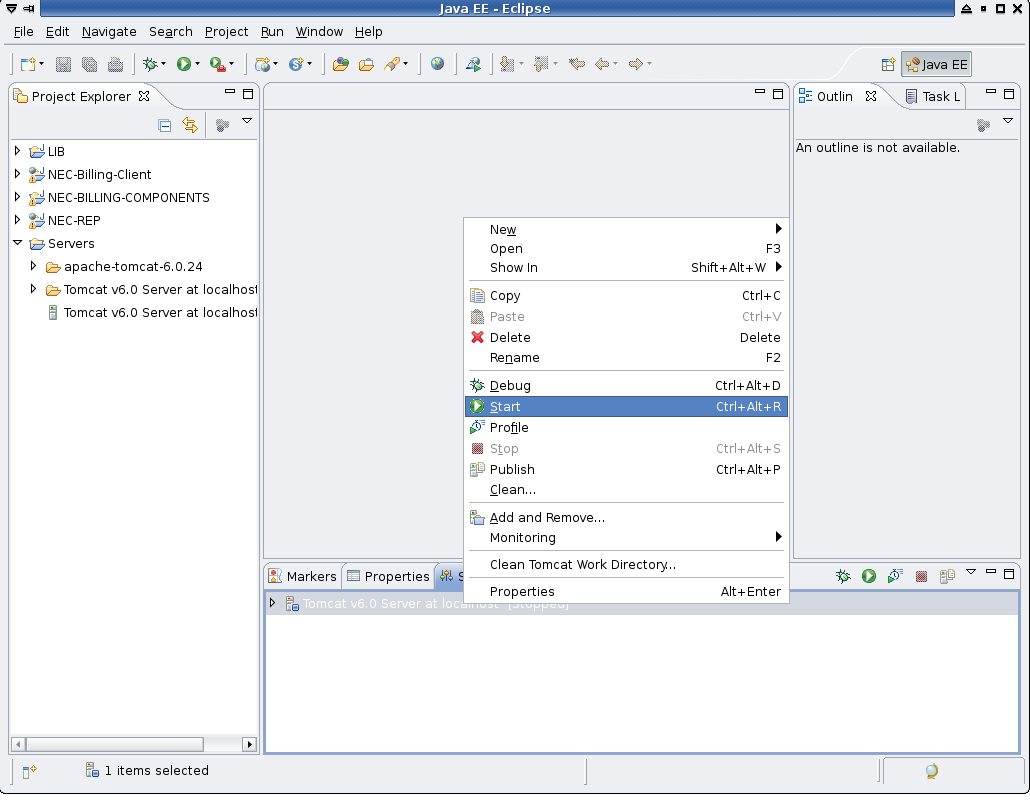
Finally, we need to edit the run configuration for the tomcat server. Click on the right mouse button on the Tomcat v6.0 Server at localhost entry in the Servers window of Eclipse and select start as below.

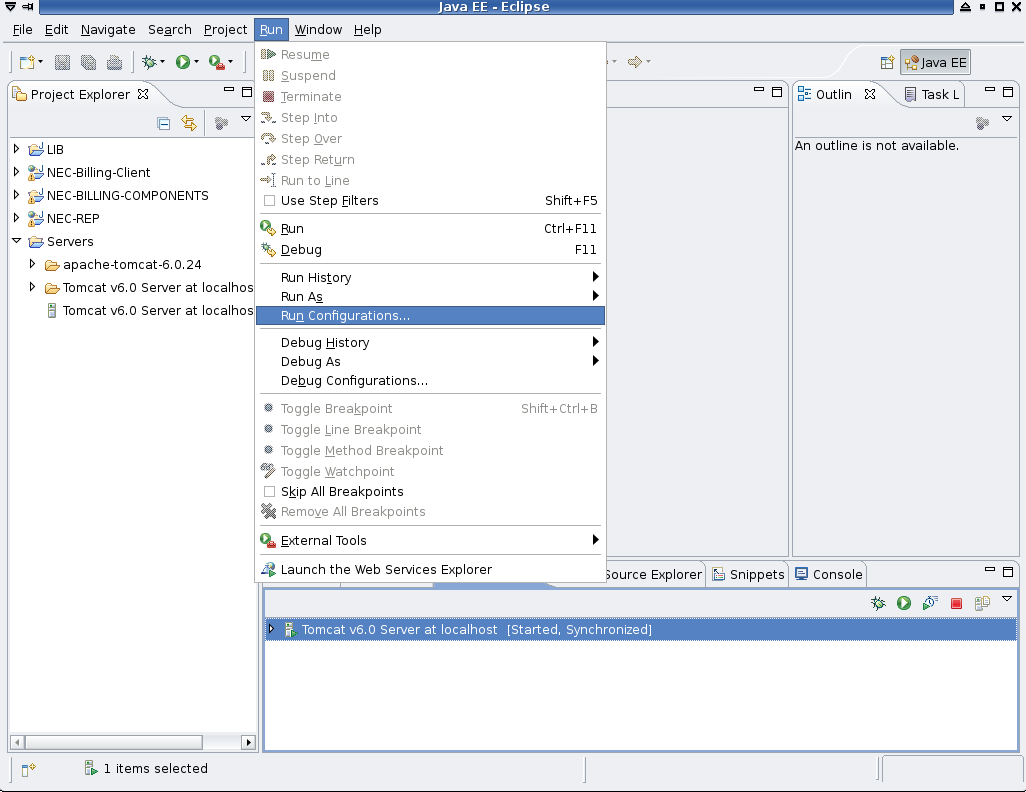
Choose Run->Run Configurations

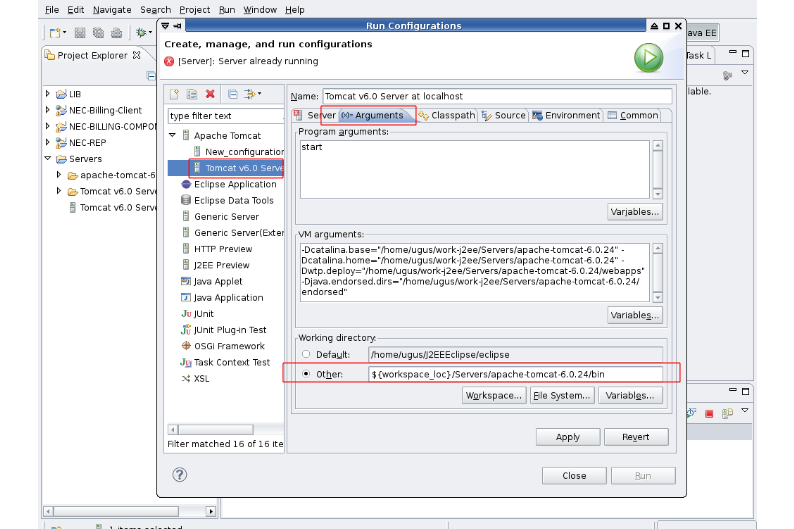
Add ${workspace_loc}/Servers/apache-tomcat-6.0.24/bin as the working directory in the Run configurations window as shown below.

Save the changes by clicking on the Apply button and close the configuration window.
Installing Firefox Plug-in
The present plug-in is an extension to Mozilla's Firefox Web browser. Thus, an installation of Firefox 3.x is required.
Configuring Firefox
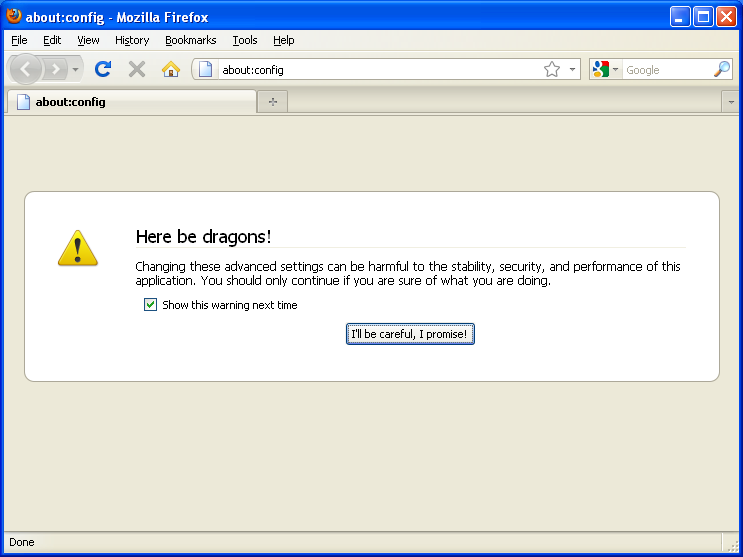
Before the actual extension can be installed, some settings need to be configured within Firefox. To do so, please enter about:config into the location text field as shown in the figure below.

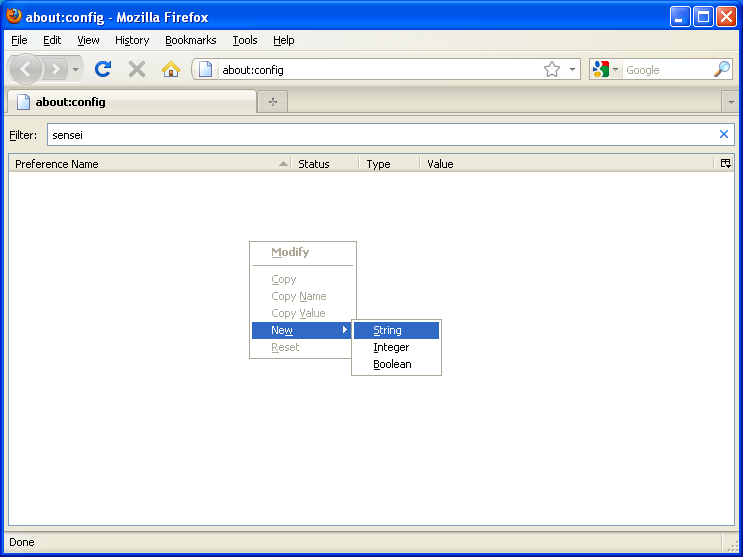
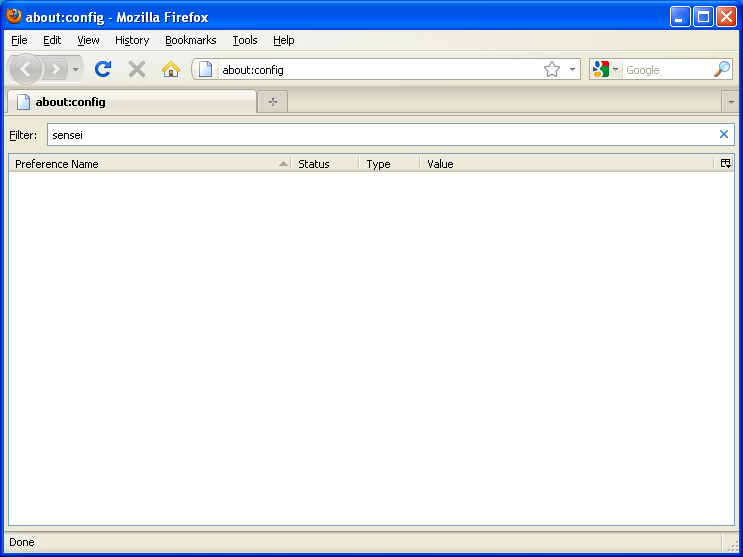
Please continue by clicking on the "I'll be careful, I promise" button. The next screen shows a list of all Firefox internal properties. Here, you can also specify own properties. In fact, we need some for our Sensei plug-in. To see whether there are already Sensei-related propteries set, simply type sensei into the filter text field. The list should then be empty as shown in the following figure.

To add a first Sensei property, press the right mouse button and choose New | String from the pop-up menu as shown below.

Add the following two properties of type String:
extensions.sensei.accounting.symmetric.userKey
The secret key needs to be entered here. Please enter ade0db88dc614623498f5c53c2e1accb8cac84c594e478fe1b822555 as the value.extensions.sensei.accounting.symmetric.currentToken
Leave the value for this property empty! This will be computed and updated by the browser plug-in.
Add a third property of type Boolean:
extensions.checkUpdateSecurity
Set the value tofalse.
Congratulations, you complete the necessary configuration steps.
Install Plug-in
Please download Privacy&Billing plug-in for Firefox. Let us assume, that the installation directory of your Firefox instance is located at $FIREFOX, then please unpack the mentioned archive to
- Linux:
$FIREFOX/extensions/* - Windows:
$FIREFOX\extensions
Final Wrap-up
That's it! Now you only need to restart your Firefox browser. Do not worry about the Sensei Firefox plug-in being shown with a warning symbol when your browser restarts as shown in the following figure.

This warning simply means, that not all functionalities demanded by Firefox such as an update mechanism have been implemented yet. Still, the core functionality required foe Sensei is implemented.
Your browser is now set for using secured Sensei services.
Uninstall Plug-in
If you want to uninstall the plug-in, simple use the button provided by the Firefox Add-on Manager (as shown in the above figure). After that, the final step is to delete the Sensei-related properties from the internal Firefox registry.
Setting up the Secret Key
If you already entered the secret key in your browser in the Configuring Firefox section above, you can skip this section.
Once the Firefox plug-in is installed, you need to set your secret key. To do so, please open the firefox configuration page by running about:config on the browser's address bar as shown below.
Please continue by clicking on the "I'll be careful, I promise" button. The next screen shows a list of all Firefox internal properties. To list the Sensei-related properties set, simply type sensei into the filter text field. The list should be then as shown in the following figure.

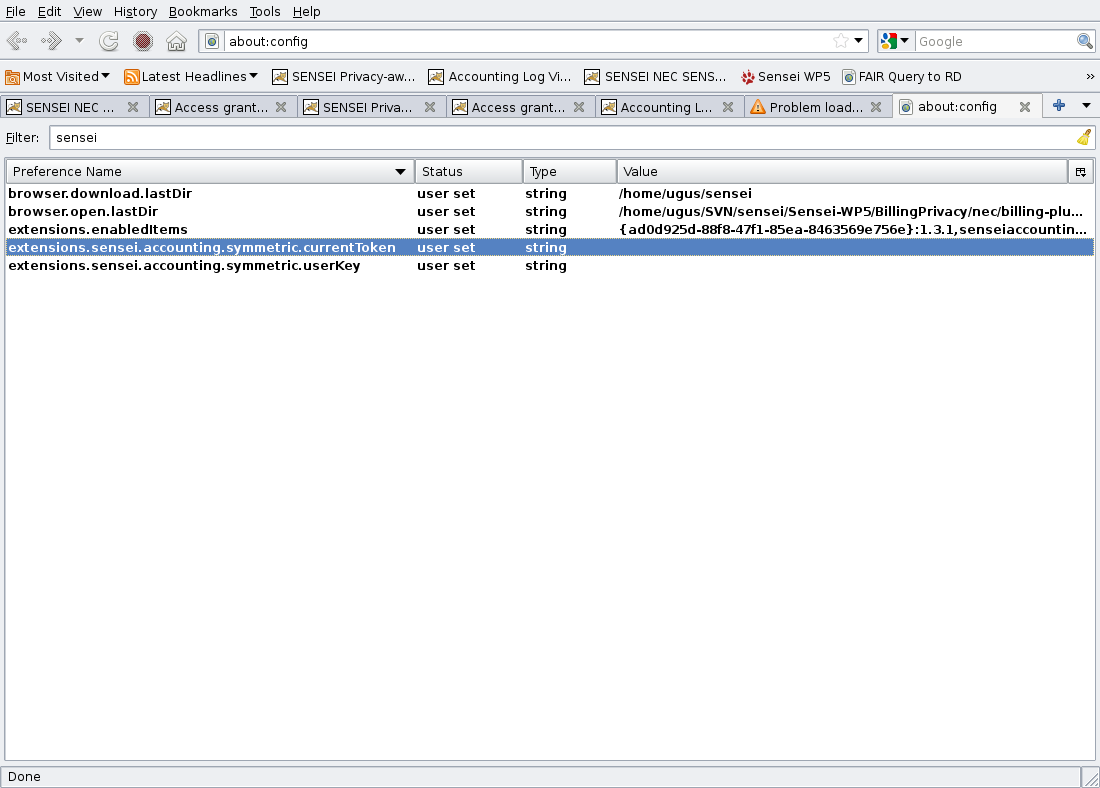
There are two sensei preferences:
extensions.sensei.accounting.symmetric.userKey
extensions.sensei.accounting.symmetric.currentToken
The secret key for a test drive is ade0db88dc614623498f5c53c2e1accb8cac84c594e478fe1b822555.
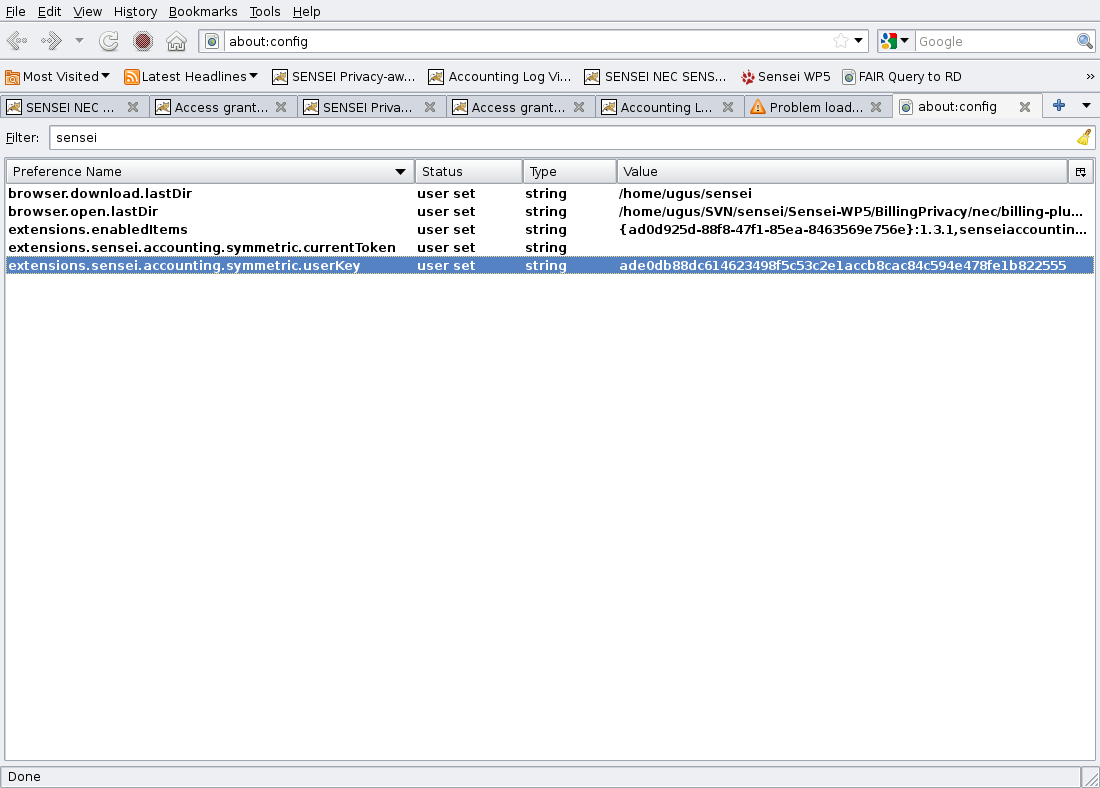
As each resource user must have a unique key, in a real deployment each user needs to obtain its unique secret key. Please copy this key string in your extensions.sensei.accounting.symmetric.userKey property. To do this, please just double click on this property. After setting the key, your sensei properties should look like as in the figure below.

As a default, your extensions.sensei.accounting.symmetric.currentToken property token must be empty for start-up. In a first installation, you do not need to do anything for this property. However, please clean it if it contains something.
Running the Test Application
Eclipse project contains a simple application for testing the basic functionalities of privacy and billing solution. A simple component NEC-REP forwards the resource requests to the Billing Client and Billing Service components which are the core of the contribution. NEC-REP can be replaced by any REP component which provides resources to the SENSEI architecture.
To run the the test application, please start the tomcat server as shown in the figure below or just restart it if it is already running.
This will compile and deploy the web applications into Servers/apache-tomcat-6.0.24/webapps in the workspace.
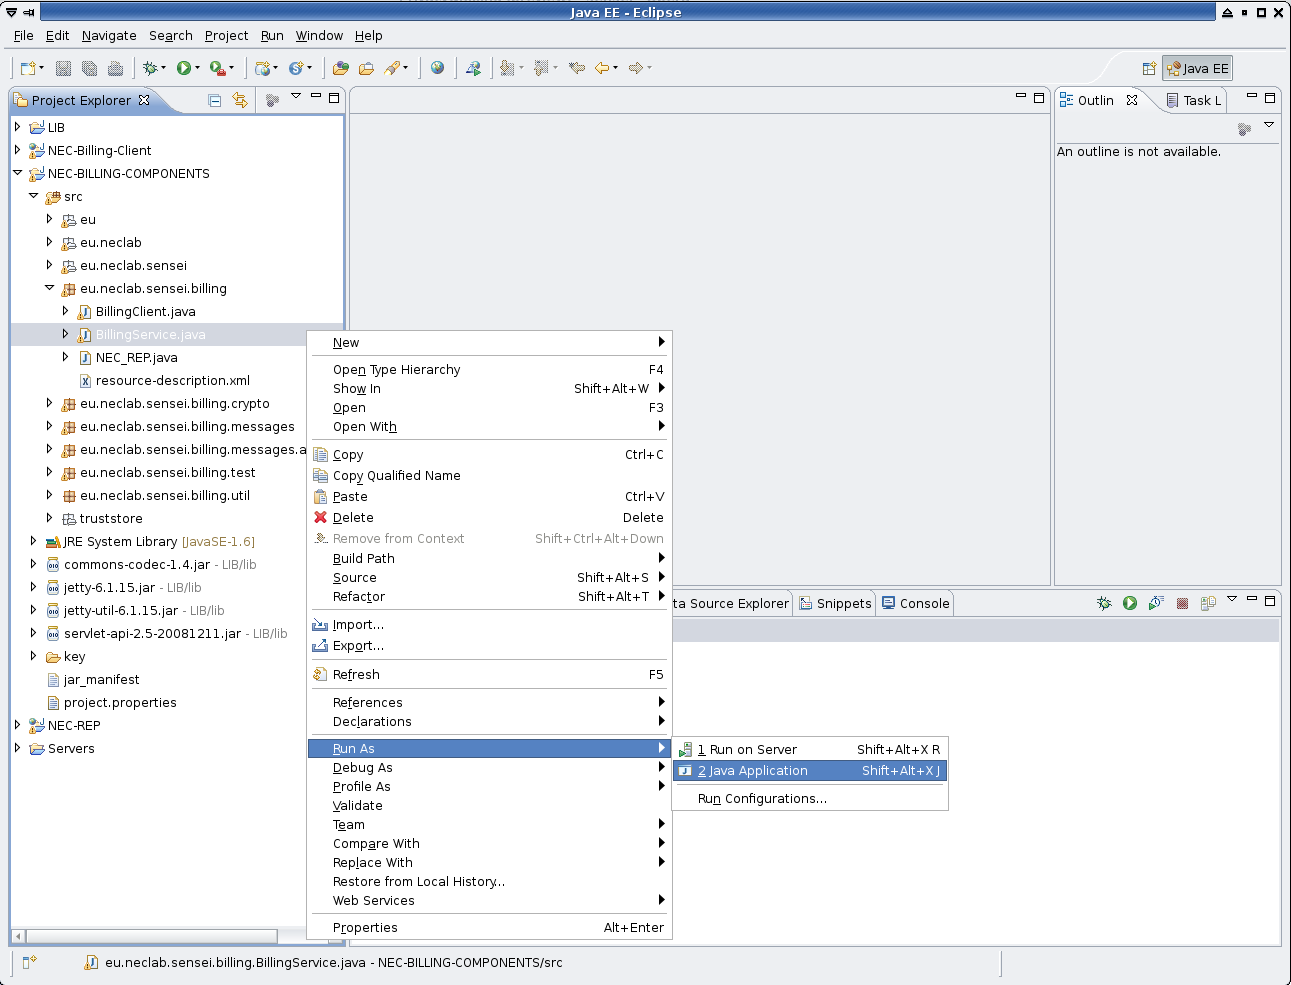
Now, the Billing Service component needs to be started. This application needs to be run as a java application. To do so, right click on the BillingService?.java file in eu.neclab.sensei.billing located under the NEC-BILLING-COMPONENTS project. This is shown below in the figure.

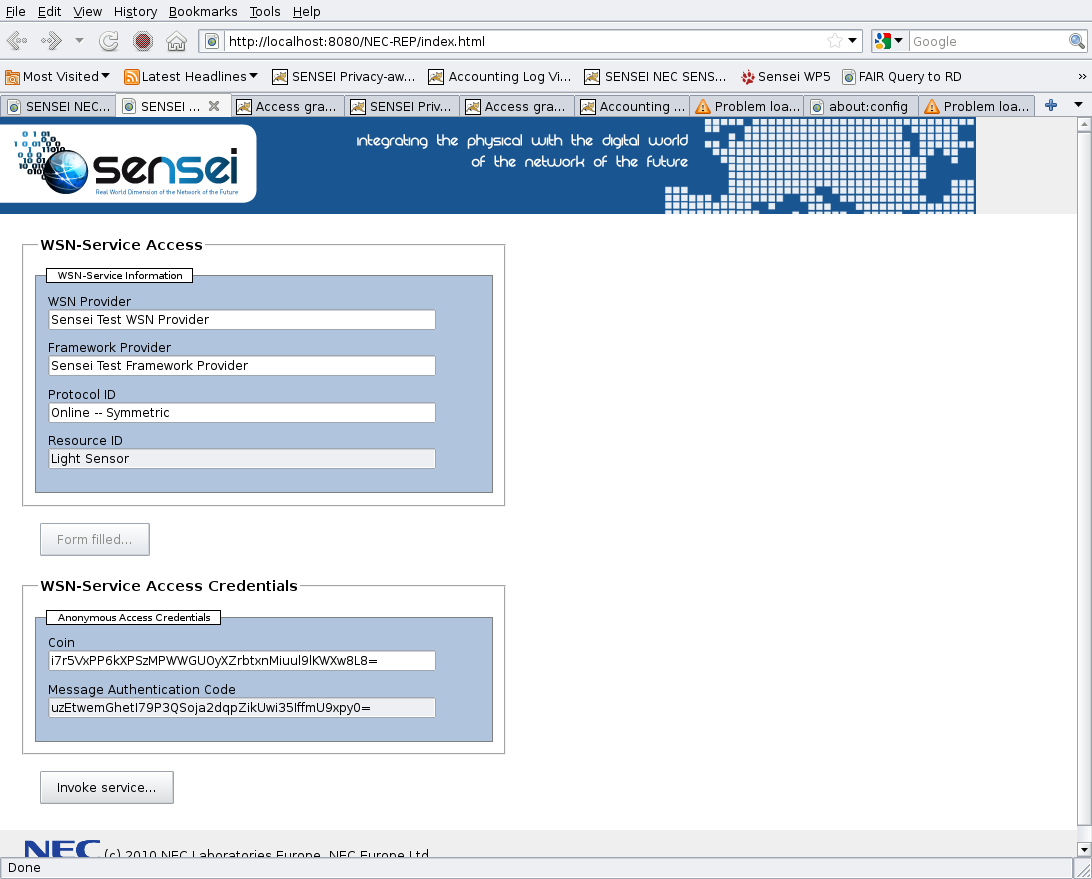
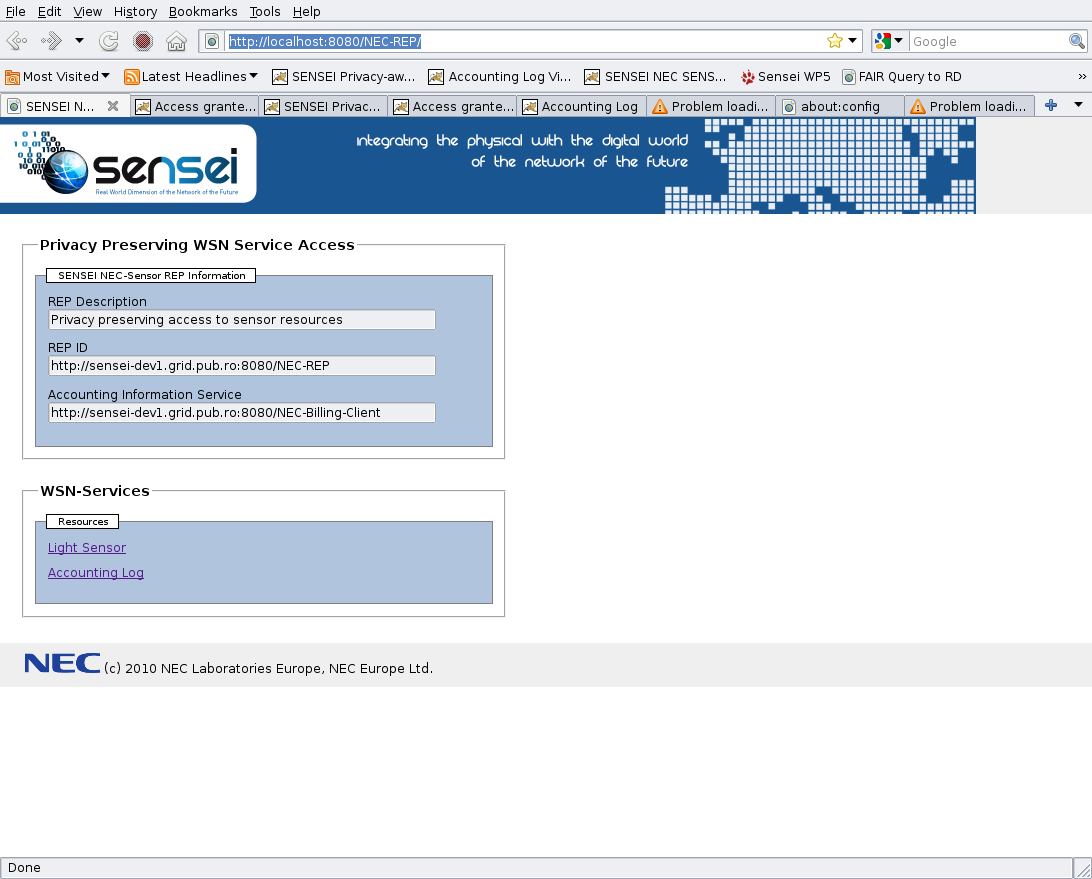
In order to access the resources, please give http://localhost:8080/NEC-REP/ into your firefox browser. You will receive the web page shown below including information about the provided services.

Click on the light sensor link to access the resource protected with the privacy preserving access control mechanism. If you press the "Form filled..." button you should see another area sliding in, containing the cryptographic access tokens computed by the browser extension.

Press the Invoke service button to send an authenticated request. If the cryptographic access token is valid, you will receive the response page shown below.

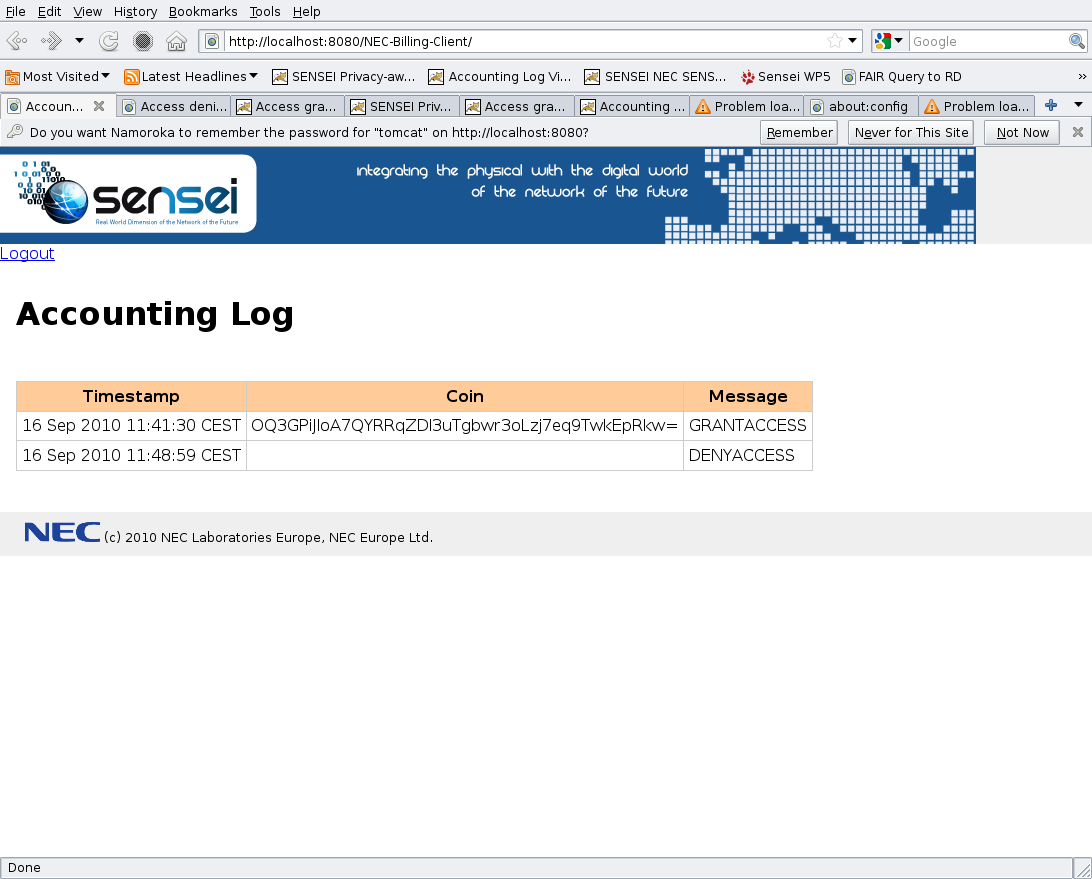
In order to access the accounting information, please give http://localhost:8080/NEC-Billing-Client/ into your browser and log-in with following username and password:
- Username:
tomcat - Password:
tomcat
You will see a page containing the history of the resource accesses and the digital coins for the granted accesses.

Attachments (22)
- access-granted.png (117.1 KB) - added by 14 years ago.
- accounting.png (131.1 KB) - added by 14 years ago.
- browser_about-config.png (29.6 KB) - added by 14 years ago.
- browser_about-config_new-string.png (25.8 KB) - added by 14 years ago.
- browser_about-config_sensei-filter.png (24.4 KB) - added by 14 years ago.
- browser_extension-warning.png (25.0 KB) - added by 14 years ago.
- eclipse_1.png (52.1 KB) - added by 14 years ago.
- eclipse_2.png (63.7 KB) - added by 14 years ago.
- eclipse_3.png (105.6 KB) - added by 14 years ago.
- eclipse_4.png (63.7 KB) - added by 14 years ago.
- eclipse_5.png (69.1 KB) - added by 14 years ago.
- eclipse_6.png (98.1 KB) - added by 14 years ago.
- eclipse_7.png (88.0 KB) - added by 14 years ago.
- eclipse_8.png (68.2 KB) - added by 14 years ago.
- eclipse_9.png (75.9 KB) - added by 14 years ago.
- eclipse_10.png (148.9 KB) - added by 14 years ago.
- firefox_1.png (54.3 KB) - added by 14 years ago.
- firefox_2.png (56.3 KB) - added by 14 years ago.
- light-access.png (141.3 KB) - added by 14 years ago.
- nec-rep.png (129.5 KB) - added by 14 years ago.
- run_1.png (115.7 KB) - added by 14 years ago.
- deployment_scenario.png (78.3 KB) - added by 14 years ago.
Download all attachments as: .zip